Import
Import brings existing data into MyNetworkmap – from a spreadsheet, a database or another survey. There are two modules:
| Module | Purpose |
|---|---|
| Import actors | Creates actors and fills their attribute values |
| Import relations | Creates relations between actors that already exist |
Both work with CSV data – text whose columns are separated by a delimiter – and run in the same three steps: paste the data, map the columns, import.
There is a way round this module. A range of cells from Excel or LibreOffice Calc can be dragged straight onto a network map – the quicker route for a manageable list that is to land on the map right away. It creates no relations, though, and it cannot update existing actors either.
Caution: the import always writes into the active project. It is named in the blue note Import into: … at the top of the page. Check it before reading in larger amounts of data.
Note: importing needs at least the role Editor. Without the role the module does not even open.
The order is mandatory: actors first, then relations. The relation import can only link what is already there.
Importing actors
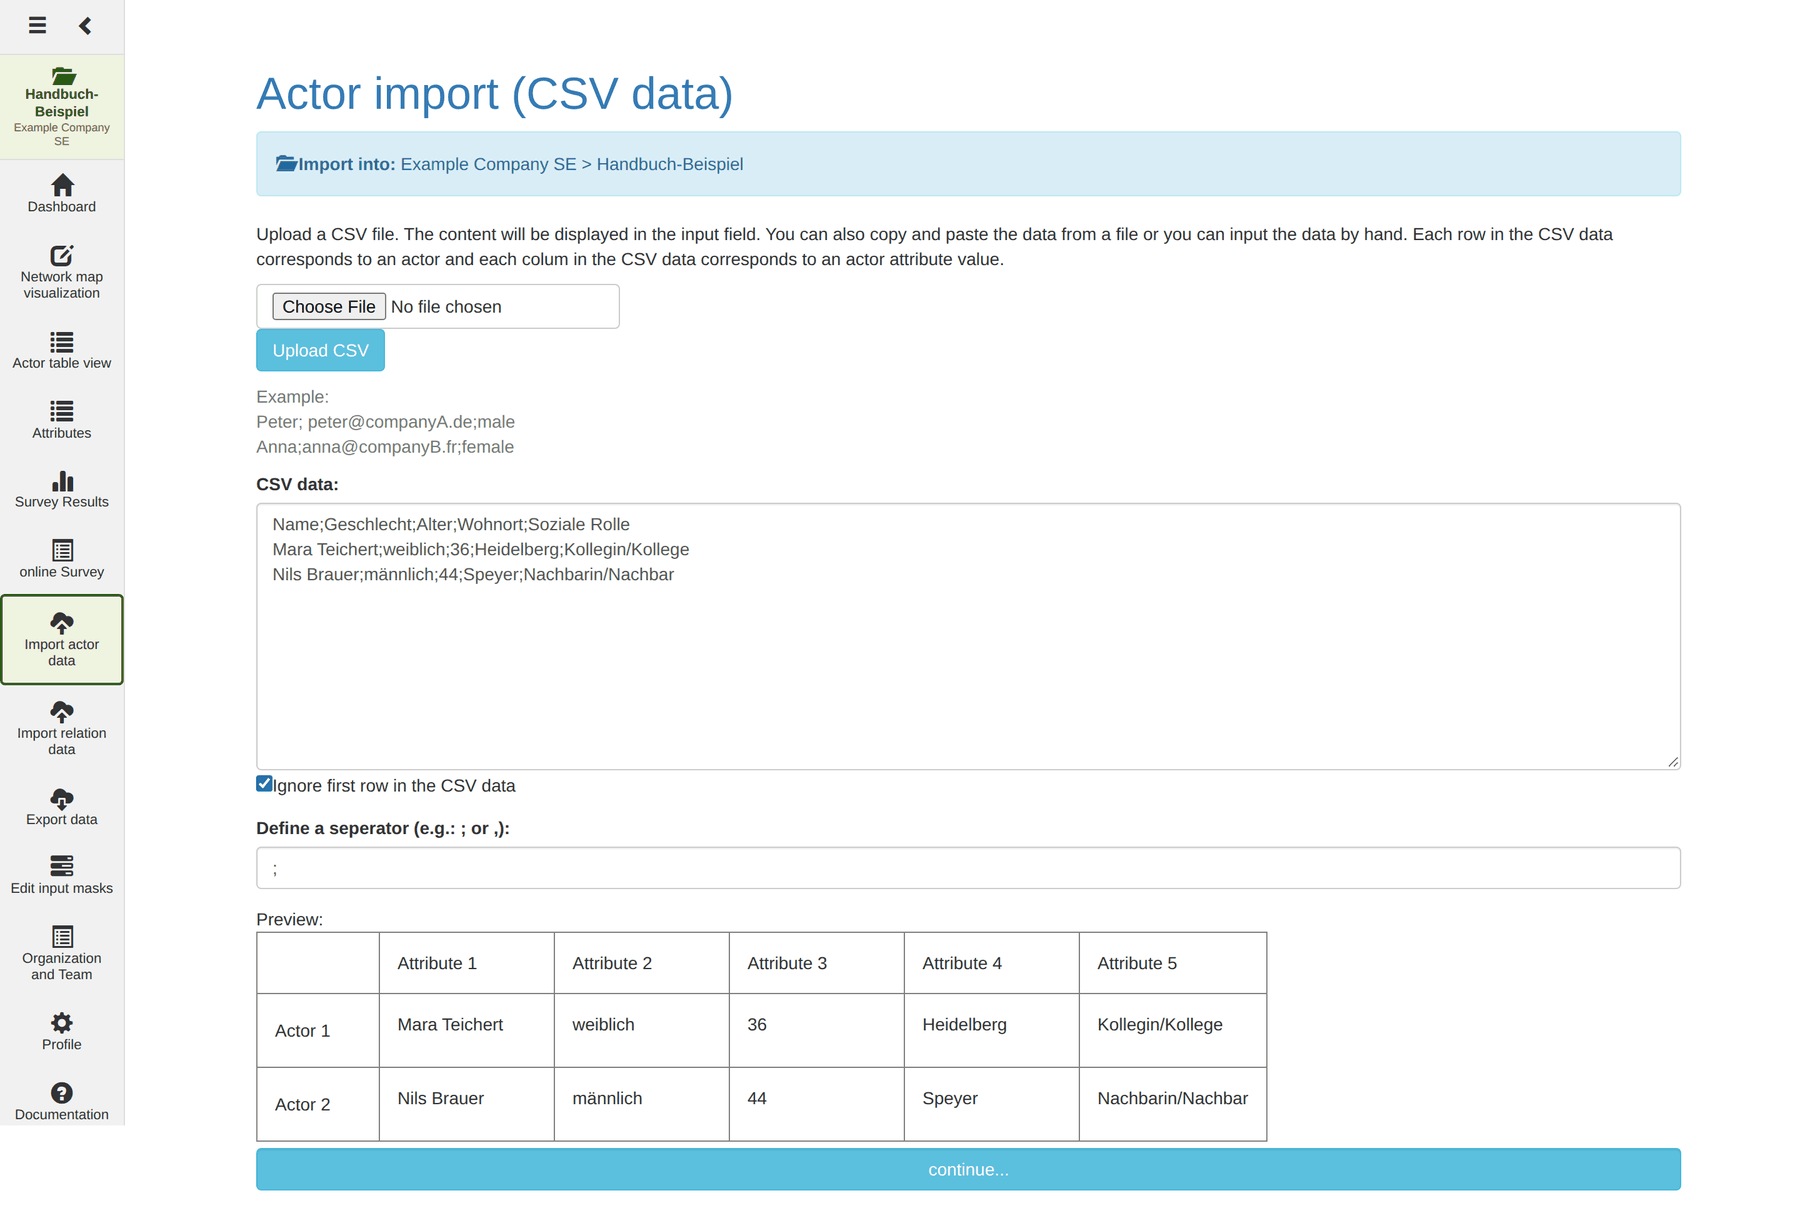
Step 1: providing the data
Two routes:
- Upload a file: choose a CSV file through Choose file and click Upload CSV. The content appears in the text area.
- Paste or type: copy the data straight into the large text area.
Every row is one actor, every column one attribute:
Name;Geschlecht;Alter;Wohnort;Soziale Rolle
Anna Berger;weiblich;34;Heidelberg;Freundin/Freund
Bilal Demir;männlich;41;Mannheim;Kollegin/Kollege
Clara Hoffmann;weiblich;29;Heidelberg;Kollegin/Kollege
Below that you set two things:
- Ignore the first row of the CSV data – tick it when the first row holds column headings.
- Delimiter – usually
;or,. The preview below the field shows at once whether the split is right.
Tip: always look at the preview before moving on. If the whole row sits in a single column, the delimiter is wrong. If your data contains semicolons inside the text, use a different delimiter – a tab, for instance.
Continue… leads to the next step.
Step 2: mapping the columns
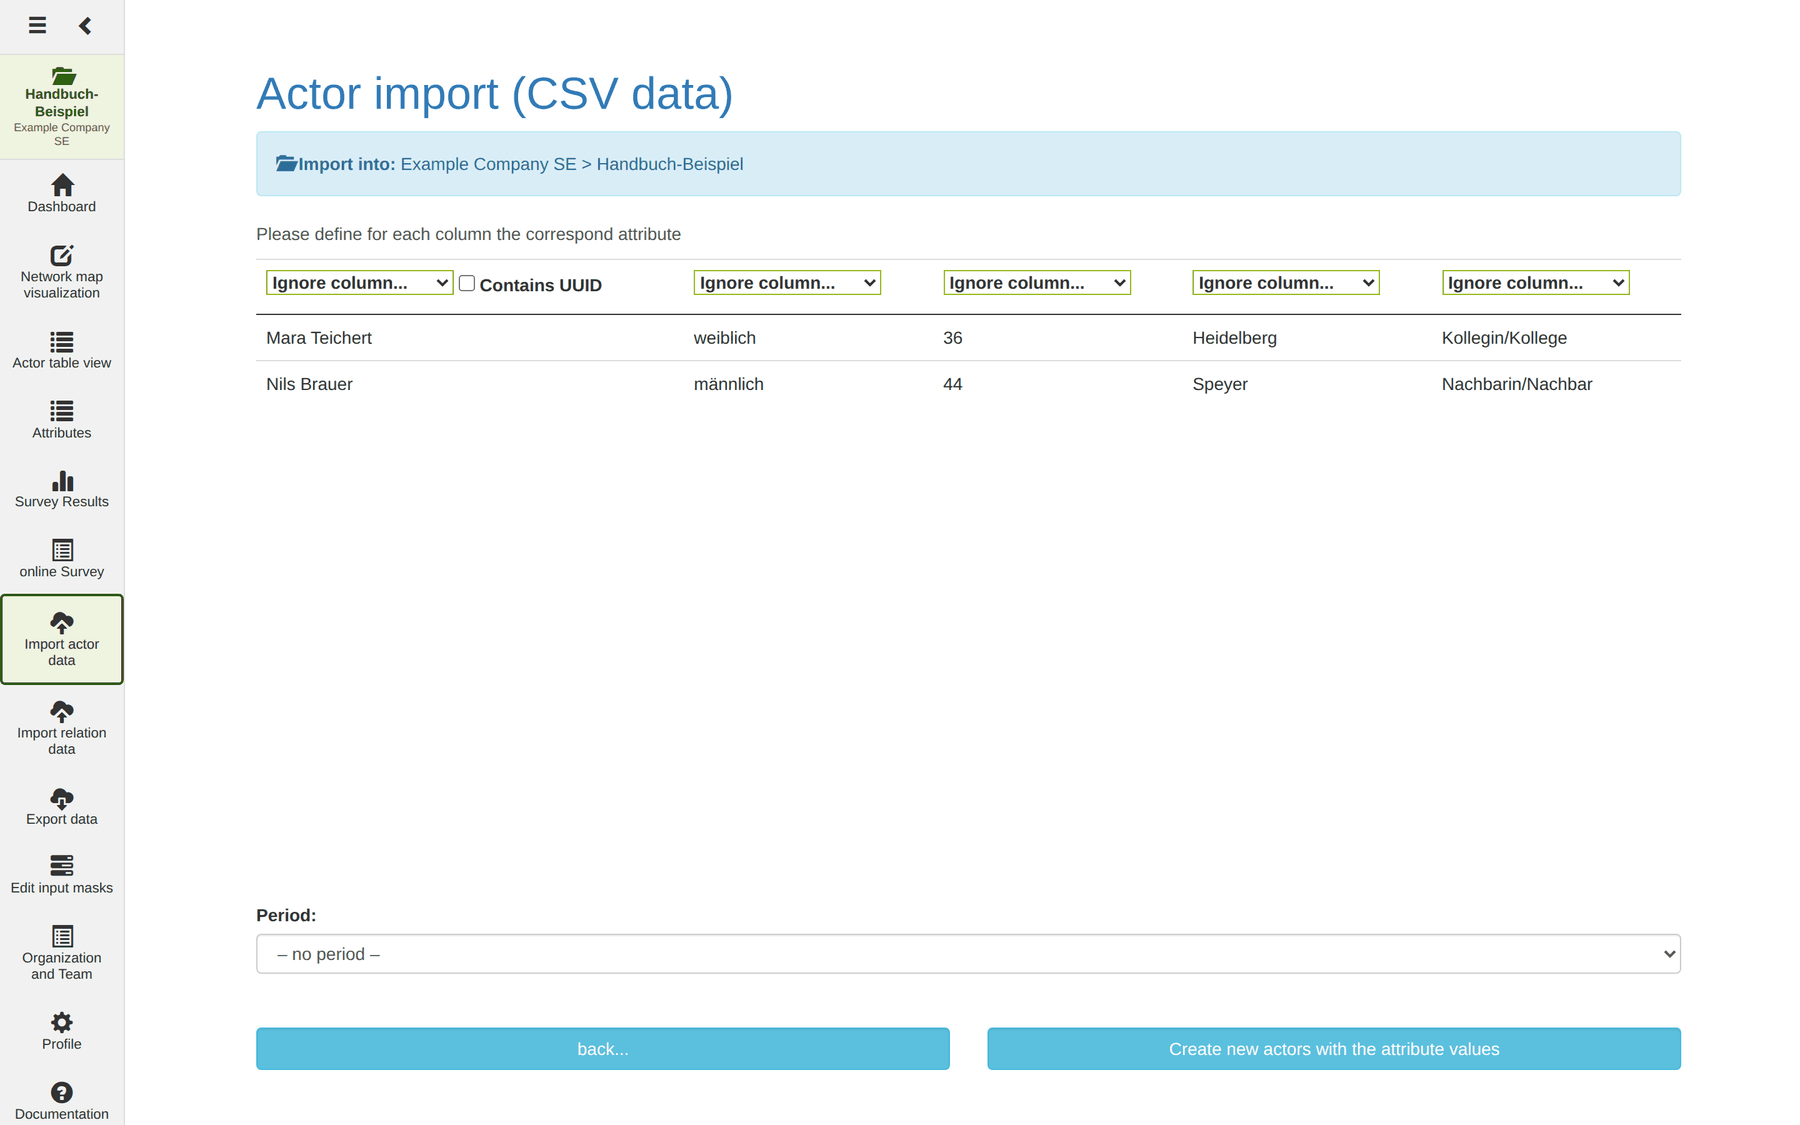
Above each column is a dropdown in which you set the target attribute. The attributes are grouped into Free answer attributes and Predefined answer attributes.
| Entry | Meaning |
|---|---|
| Ignore column… | This column is not imported |
| Actor ID (UUID)… | First column only: the values are actor IDs |
| An attribute name | The values are written into that attribute |
Below the first column's dropdown there is also Contains UUID. At the very bottom you can optionally choose a period.
Create actors with the attribute values runs the import.
Updating existing actors instead of creating new ones
By default every row produces a new actor. Two routes lead to an update instead:
Through the actor ID. Assign Actor ID (UUID)… to the first column. If it holds the ID of an existing actor, the row's values are written to that actor. If the ID is unknown or empty, a new actor is created.
Through a free-text value. Tick Contains UUID and assign a free-text
attribute – Name, say – to the first column. MyNetworkmap looks for the actor
with that value and updates them.
Tip: the actor ID is the more reliable route: names can occur twice, and then the search hits the first match. You get the IDs from an export of the actor data.
Caution: if a cell is empty for an existing actor, the previous value of a predefined attribute is deleted. Leave columns that should stay unchanged out of the import entirely (Ignore column…).
Error messages
| Message | Meaning |
|---|---|
| Please enter data and set a delimiter. | Text area or delimiter is missing |
| … does not occur as a predefined value in … | The value is not in the attribute's value list |
| No write permission | Actor or attribute does not belong to your project |
| Please correct your entries. No actors were created. | The import was aborted; nothing was created |
The messages name the column and the row.
The commonest error is the second one: a predefined attribute accepts only values from its list, and character for character.
maennlichis notmännlich,Yesis notyes. Either correct the data or add the value under Attributes.Reassuringly, the import is all or nothing. If it aborts, no half a data set has been created.
Importing relations
The procedure is the same; the meaning of the columns is different.
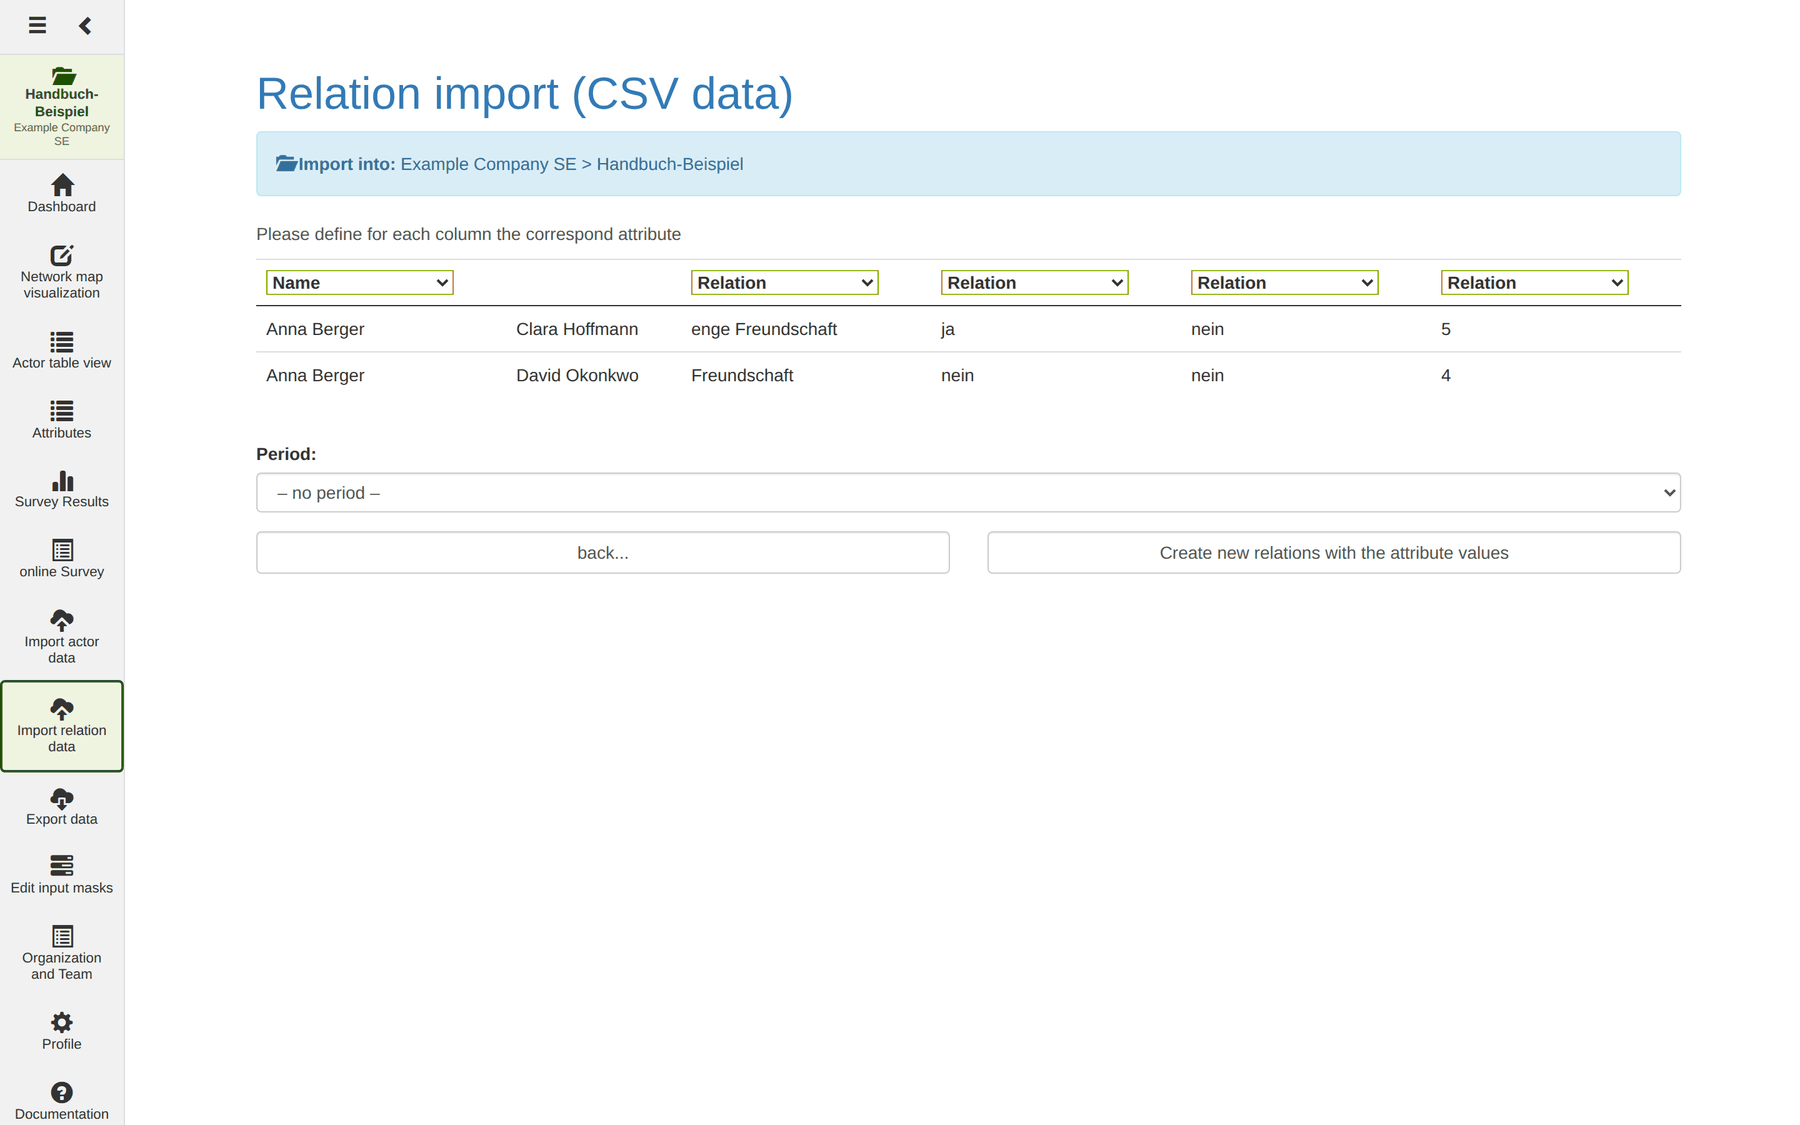
How the data is structured
| Column | Content |
|---|---|
| 1 | Source actor |
| 2 | Target actor |
| 3 and on | One relation attribute with its value each |
Von;Nach;Freundschaft;Finanzielle Hilfe;Konflikt;Stärke
Anna Berger;Clara Hoffmann;enge Freundschaft;ja;nein;5
Anna Berger;David Okonkwo;Freundschaft;nein;nein;4
Clara Hoffmann;Anna Berger;enge Freundschaft;ja;nein;5
Direction counts.
Anna;ClaraandClara;Annaare two rows and two relations. Only if both are present is the relation mutual – and only then does it appear on the network map as a double arrow.
Step 2: mapping
- Above the first column you set how the actors are identified – by the
attribute
Name, say, or through Actor ID. The same mapping applies automatically to the second column, which therefore has no dropdown of its own. - Above every further column you choose the relation attribute.
- If your data has only two columns, an additional dropdown appears on the right for one relation attribute and one value for all rows.
- A period can be assigned at the bottom here too.
Caution – the commonest stumbling block: because the second column has no dropdown of its own, the mapping is shifted by one against what you expect. With six data columns there are five dropdowns: one for identifying the actors and four for the relation attributes. Map them wrongly and the import reports … does not occur as a predefined value … – good protection, but the message does not name the real cause.
Create relations with the attribute values runs the import.
Tip: create the relation attributes beforehand under Attributes, including every value that occurs in your file.
After the import
Check the result in the actor table: show the imported attributes as columns and sort by them. The Connected column shows whether the relations arrived; an actor with 0 where relations were expected points to a name error.
Then bring the actors onto a map through the Actors section of the network map.
Import as a tool for repeated setups
Attributes cannot be copied between projects – but the import helps anyway: the same CSV structure produces the same result in every project. For several similar projects – the three school classes of use case 2, say – you create the attributes once per project by hand and then import the same column structure each time.
Tip: keep your import files. They double as traceable documentation of what entered the project – and, together with export in the other direction, as a full backup format.